Extra Creamy Chocolate Cheesecake is the dessert I make when I want everyone at the table to go quiet for a few blissful minutes. Perhaps you’ve tried baking cheesecake before and ended up with cracks, a dry edge, or a filling that felt slightly grainy. I get it. I’ve been there, scraping pan sides and wondering what went wrong. Today, I’m sharing how I make it ultra-smooth, deeply chocolatey, and reliably gorgeous. If you’re craving a cozy, impressive dessert that still feels doable on a weeknight, you’re in the right place.
Ingredients
Here’s exactly what I use for an 8 or 9-inch springform pan. These amounts make that signature dense, velvety texture we all want in an Extra Creamy Chocolate Cheesecake.
- Crust
- 24 chocolate sandwich cookies (or 1 3/4 cups chocolate wafer crumbs)
- 5 tablespoons unsalted butter, melted
- Pinch of salt
- Chocolate Filling
- 24 ounces full-fat cream cheese, at room temperature
- 1 cup granulated sugar
- 1/2 cup sour cream, at room temperature
- 1/2 cup heavy cream, at room temperature
- 3 large eggs, at room temperature
- 8 ounces good-quality semisweet or bittersweet chocolate, melted and slightly cooled
- 2 tablespoons unsweetened cocoa powder
- 1 teaspoon pure vanilla extract
- 1/4 teaspoon fine salt
- 1/2 teaspoon instant espresso powder (optional, to boost chocolate flavor)
- For the Pan and Water Bath
- Heavy-duty foil (for wrapping the pan)
- Hot water (for the water bath)
- Optional Toppings
- Softly whipped cream
- Chocolate shavings
- Fresh berries
- Warm chocolate sauce
Room temperature ingredients are crucial. Cold cream cheese can make the batter lumpy, and overmixing to fix it adds air, which causes cracks. Give everything at least 1 hour on the counter.
How to make chocolate cheesecake
Prep and crust
- Heat oven to 325°F. Butter the bottom and sides of a springform pan. Line the bottom with parchment for extra insurance.
- Wrap the outside of the pan in a double layer of heavy-duty foil so water can’t sneak in during baking.
- Pulse cookies to fine crumbs. Stir in melted butter and salt. Press firmly into the bottom of the pan. Bake 8 to 10 minutes, then cool while you make the filling.

Silky filling and bake
1. Beat the cream cheese on medium speed for 2–3 minutes, until completely smooth and fluffy. Scrape down the bowl well.
2. Add the sugar and beat for 1 minute, until fully combined.
3. Mix in the sour cream, heavy cream, vanilla, salt, and espresso powder. Beat until smooth, then scrape the bowl again.

4. On low speed, beat in the cocoa powder until fully incorporated.
5. Pour in the melted chocolate and mix just until combined. The batter should look glossy and thick.
6. With the mixer on low speed, add the eggs one at a time, mixing just until blended.
Do not overmix — slight streaks are fine and will bake out.
7. Pour the filling over the prepared crust. Gently tap the pan on the counter to release any surface air bubbles.
8. Wrap the outside of the springform pan tightly with foil and place it in a large roasting pan.
9. Carefully pour hot water into the roasting pan until it reaches halfway up the sides of the springform pan.
10. Bake for 55–70 minutes, until the edges are set and the center jiggles slightly like Jell-O.

11. Turn off the oven, crack the door open slightly, and let the cheesecake rest inside for 45 minutes.
12. Remove the pan from the water bath. Run a thin knife around the edges to loosen.
13. Cool completely at room temperature, then refrigerate for at least 6 hours or overnight.
14. Slice with a warm knife for clean, smooth cuts.
“I made this for my team and three people asked for the recipe on the spot. The texture was café-level smooth and the chocolate flavor was intense without being bitter.”
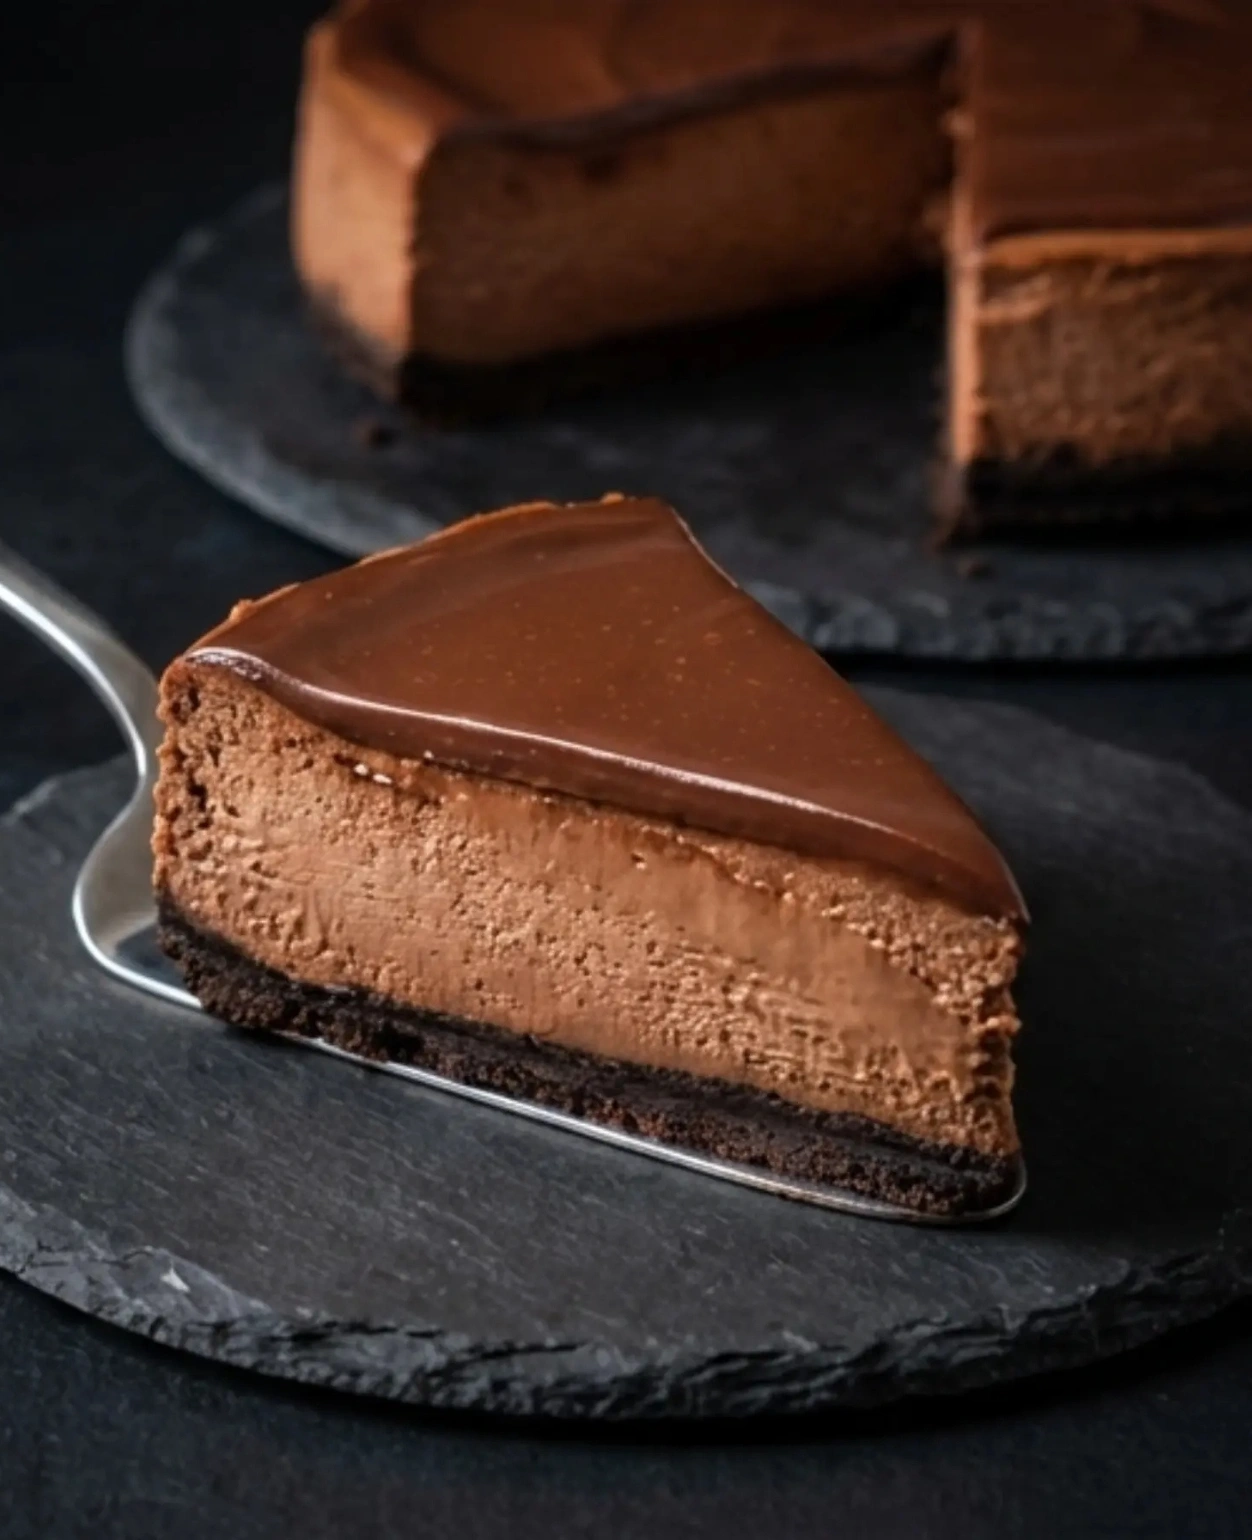
Once chilled, your Extra Creamy Chocolate Cheesecake should slice like a dream with a lush, custardy center and a neat, sturdy edge.
Tips for making a perfect chocolate cheesecake

Temperature and texture
Let everything come to room temp before mixing. Cold cream cheese fights the mixer and traps lumps. Beat the cream cheese first until it is fully smooth, before adding anything else. Mix on low once the eggs are in to avoid whipping in air. Overmixing creates bubbles that rise into cracks.
Use a water bath for gentle, even heat. It keeps the outer ring from overcooking while the center sets slowly. The result is that signature velvety bite that makes an Extra Creamy Chocolate Cheesecake feel restaurant-worthy.
Toppings and finishing
For a shiny chocolate top, warm 1/2 cup heavy cream and pour it over 4 ounces chopped chocolate, then swirl it over the chilled cake. Or keep it simple with lightly sweetened whipped cream and berries. A microplane makes gorgeous chocolate shavings in seconds.
Want a chocolate overload kind of evening? Try my Chocolate Stout Cake for a rich, malty companion dessert. It is impressive and pairs perfectly with coffee.
Quick visual cues: edges set, center wobbly; no browning on top; a thin knife runs clean-ish around the edge after baking to prevent sticking. Patience is your best friend here.

Why do I need to use a water bath for cheesecake?
Cheesecake is essentially a baked custard, and custards love gentle heat. A water bath acts like a buffer. The hot water regulates the temperature so the outside does not overbake while the middle sets. Without it, you can get deep cracks, a rubbery edge, and uneven texture.
It also adds steam, which prevents the surface from drying out. If the bath makes you nervous, try this: place a roasting pan on a lower rack with hot water and bake the cheesecake on the rack above it. It is not as perfect as a direct bath, but it still adds humidity. Either way, wrap the springform pan tightly in foil and make sure the seam sits high on the side. If you are worried about leaks, you can set the springform inside a slightly larger cake pan, then set that inside the roasting pan with water.
Bottom line: A water bath is your best insurance for a smooth, crack-free top and that extra creamy bite that makes this dessert special.
Make Ahead and Storage Notes
Freezing guide
Cheesecake is a make-ahead superhero. Bake it a day or two before serving, chill overnight, then keep it covered in the fridge for up to 5 days. For longer storage, freeze the whole cake or individual slices. Chill it fully, remove the springform ring, then wrap tightly in plastic and a layer of foil. Freeze up to 2 months. Thaw overnight in the fridge.
Keep toppings separate until serving so they stay fresh. For clean slices, warm a sharp knife under hot water, wipe it, and cut. Repeat between slices. If you somehow have leftovers, crumble a slice into parfait glasses with Greek yogurt and berries, or turn breakfast into dessert with these Strawberry Cheesecake Overnight Oats. No complaints when cheesecake is involved.
Food safety note: Do not leave cheesecake out longer than 2 hours at room temp. It is dairy-rich and needs the fridge to stay safe and at its best.
What chocolate should I use for a no-bake chocolate cheesecake?
No-bake versions rely on a different balance: less heat, more chill time, and often a stabilizer like gelatin or whipped cream. For chocolate, use bars you would eat out of hand rather than baking chips. Chips contain stabilizers that resist melting smoothly. I like 60 to 70 percent cocoa for deep flavor without bitterness. Melt gently in the microwave in short bursts or over a double boiler, and let it cool slightly before folding into the creamy base.
Milk chocolate is sweeter and softer, so if you use it, reduce sugar a bit and expect a slightly looser set. Cocoa powder can enhance color and flavor, but real melted chocolate gives that silky body. If you want a fruity spin, peek at my Easy Vegan No-Bake Cherry Cheesecake for a completely different but equally satisfying option.
For a single-serve chocolate fix when you do not want to turn on the oven, this cozy Vegan Chocolate Mug Cake is a quick win in the microwave and scratches the same chocolate itch.

Common Questions
How do I prevent cracks besides the water bath?
Do not overmix once eggs are in, bake at a steady 325°F, avoid opening the oven during the first 40 minutes, and always cool gradually in the turned-off oven with the door slightly open.
What if I do not own a springform pan?
Use a 9-inch deep cake pan lined with a long strip of parchment on the sides and a round on the bottom. Chill fully and use the parchment to lift slices. Cutting and serving is a little fussier, but doable.
Can I swap the crust?
Absolutely. Graham crackers, chocolate wafers, or even pretzels for a salty kick. Just keep the butter ratio similar so it presses and bakes into a firm base.
How do I get clean, neat slices?
Warm a sharp knife under hot water, wipe dry, cut, and repeat the warm-and-wipe routine for each slice. It is the easiest path to picture-perfect pieces.
Can I reduce the sugar?
You can drop it by about 2 to 3 tablespoons without affecting the texture. Go beyond that, and the cheesecake can lose balance because sugar helps structure and moisture.
Let’s make your new favorite chocolate cheesecake
With a little patience and the right steps, an Extra Creamy Chocolate Cheesecake is absolutely within reach at home. Keep your ingredients at room temperature, trust the water bath, and give the cake a nice, long chill. The reward is a dense, silky slice that tastes like a hug in dessert form. If you try it, let me know how it goes and what toppings you loved most. Happy baking and enjoy every chocolatey bite.

Chocolate Cheesecake
Ingredients
Crust
- 24 cookies chocolate sandwich cookies (or 1 3/4 cups chocolate wafer crumbs)
- 5 tablespoons unsalted butter, melted
- 1 pinch salt
Chocolate Filling
- 24 ounces full-fat cream cheese, at room temperature
- 1 cup granulated sugar
- 1/2 cup sour cream, at room temperature
- 1/2 cup heavy cream, at room temperature
- 3 large eggs, at room temperature
- 8 ounces good-quality semisweet or bittersweet chocolate, melted and slightly cooled
- 2 tablespoons unsweetened cocoa powder
- 1 teaspoon pure vanilla extract
- 1/4 teaspoon fine salt
- 1/2 teaspoon instant espresso powder (optional) to boost chocolate flavor
For the Pan and Water Bath
- 1 roll heavy-duty foil (for wrapping the pan)
- as needed hot water (for the water bath)
Optional Toppings
- to taste softly whipped cream
- to taste chocolate shavings
- to taste fresh berries
- to taste warm chocolate sauce
Instructions
Prep and Crust
- Heat oven to 325°F. Butter the bottom and sides of a springform pan. Line the bottom with parchment.
- Wrap the outside of the pan in a double layer of heavy-duty foil.
- Pulse cookies to fine crumbs. Stir in melted butter and salt. Press into the bottom of the pan.
- Bake for 8 to 10 minutes, then cool.
Silky Filling and Bake
- Beat the cream cheese on medium speed for 2–3 minutes until smooth and fluffy.
- Add sugar and beat for 1 minute until combined.
- Mix in sour cream, heavy cream, vanilla, salt, and espresso powder. Beat until smooth.
- On low speed, beat in cocoa powder until fully incorporated.
- Pour in melted chocolate and mix just until combined.
- Add eggs one at a time on low speed, mixing just until blended.
- Pour the filling over the prepared crust and gently tap the pan to release air bubbles.
- Wrap the outside of the springform pan with foil and place it in a roasting pan.
- Pour hot water into the roasting pan until it reaches halfway up the sides of the springform pan.
- Bake for 55–70 minutes until edges are set and center jiggles slightly.
- Turn off the oven, crack the door, and let the cheesecake rest for 45 minutes.
- Remove the pan from the water bath and run a knife around the edges to loosen.
- Cool completely at room temperature, then refrigerate for at least 6 hours or overnight.
- Slice with a warm knife for clean cuts.